Monday, March 31, 2014

Have some leftover overripe banana? And getting bored to use it for banana milkshake or fried bananas? Don't throw it away. Making banana bread is one of a great and easy idea to use leftover  overripe banana. ^^ I've been searching for a banana bread recipe and tried some of them but none of them really touch my tongue and my heart. Last week, I found this recipe from cookieandkate.com and tried it with a little bit modification. It was great!! This recipe didn't use any sugar on it and use a whole wheat flour instead of white flour. The taste of honey and nutty flavor from the whole wheat flour really gave difference on the banana bread it self. I like it.


When I made it, I tried to sprinkle some mixture of brown sugar and ground cinnamon on the top of the butter right before I put it into the oven. And I liked the result. The melted brown sugar made the top of the bread become crispy and sweet and it goes really well with the taste of the banana bread itself. Totally love it and definitely going to remake this recipe again next time.

Ingredients :
  • 80 ml (1/3 cup) vegetable oil
  • 120 ml (1/2 cup) honey 
  • 178 grams (1 1/2 cup) whole wheat flour
  • 32 grams (1/4 cup) All purpose flour
  • 2 large eggs 
  • 2-3 ( about 225 grams) bananas, mashed
  • 1 tsp vanilla extract
  • 1/2 tsp salt
  • 1/2 tsp ground cinnamon
  • 1 tsp baking powder
  • 60 ml (1/4 cup) milk
  • 60 grams brown sugar + 1 tsp ground cinnamon (optional)
Preparation :

  1. Preheat oven for 170 C.
  2. Grease a loaf pan ( I was using 21x7x8 cm loaf pan) with butter. Set aside.
  3. In a bowl, mix together whole wheat flour, all purpose flour, baking powder, salt, and ground cinnamon. Set aside.
  4. In a big bowl, whisk together honey and oil.
  5. Add eggs, mashed banana, vanilla extract, and milk into the mixture and beat them all together until well combined.
  6. Add all the dry ingredients mixture into wet mixture and stir them together just until they are combined.
  7. Pour the batter into greased loaf pan.
  8. Sprinkle some mixture of brown sugar and ground cinnamon on the top of the batter (optional)
  9. Put the pan into the oven and bake it for 60 minutes (or until tooth pick test comes out clean).
  10. Take it out from the oven and let it cool for about 20-30 minutes before slicing.


Sunday, March 23, 2014

Hip hip hoera!!! my little baby son is turning 2 now. He's growing up soooo fast. He's getting bigger and smarter. It feels just like yesterday I gave birth to him and hold his tiny little body in my arm and now he's able to run, jump, recognize a lot of words. It has been 2 years already having him by my side. That's why, this time I really want to make him nice birthday cake for him. He likes watching mickey mouse on TV. So, I decided to make a mickey mouse birthday cake for him.


My first idea was a birthday cake shaped like mickey mouse clubhouse with a lot of Disney figurines surrounding the clubhouse. But it turns out if I was going to make that cake,  I would need a lot of cake and a lot of carving unless I have half round baking pan. Besides, no one sell Disney figurines nearby. I had to buy it from Ebay. I had no time to wait for the delivery when I only had 2 weeks before his birthday. Well, looked like that I had to scratch that idea and find another idea for his cake.

Google google google....

And I came up with this idea.


Mickey mouse standing on the top of the cake with some stars as his background. (sorry for this bad pictures. ^^) I would be using vanilla cake and red buttercream to cover the cake and some green buttercream to make some green grass around the mickey mouse. I think fondant is a good material for making the mickey mouse figurine and the stars. I usually change my mind in the middle of the way, but at least now my plan and design is ready. So, lets get started.

1 week before the big day, I made a mickey mouse fondant figurine. I bought white and black fondant. 2 days before making the figurine, i colored some of white fondant into red, yellow, and skin color. I've read and learned how to make mickey mouse fondant figurine from internet and I was really glad I'm living on this internet era. A lot of people shared how to make mickey mouse figurine step by step including the pictures. They are so awesome. Too bad I couldn't make the body. My mickey mouse was a little bit too chubby. The body was too heavy and I made his leg too skinny. They couldn't support the body and my mickey fell down each time I tried to make him stand even when the fondant was already dry. That's why I decided to cut his legs (ouch) and modified it into a sitting mickey mouse version. It was much more easier.

Mickey mouse fondant figurine

I think my mickey is good enough even tough my sister said that it seems my mickey just had a plastic surgery on his nose. Well... hmm... yeah... maybe it's too big. But I like it anyway and I consider it good for a first timer fondant figurine maker. And the most important thing is my son recognize it as a mickey mouse. Not as an alien or any unshaped strange creature. ^^

I made the stars from the fondant as well and using bamboo skewers for the stick. I tried to use cake pop stick but the stick was too big for the small stars. I made it manually using a knife because I do not have 5 pointy star cookie cutter. I let it dry overnight and brush it with golden glitter dust as a finishing touch.

Do you remember my cute mickey mouse cookie cutter? I was using it to make mickey mouse sugar cookies before. Now I'm using it again to make some 2D mickey mouse fondant figure. I just roll out my fondant, and cut it into mickey mouse shape using my cookie cutter. I will use this to write my son's name and maybe i will stick it in front of the cake.

2 Days before the due date. It's time to bake the cake. I'm using Ann Reardon's vanilla cake. It is delicious and moist. Trust me. From one of her  recipe, I could not only can bake 1 full round (20 cm/ 8 inch) cake, but I still have a lot of batter for 15 cm round cake, and about 20 mini cup cakes. That was quite a lot of cake. Well, after all those cakes were done, I wrapped them with a plastic wrap and put them in a plastic container to keep it soft and moist.

Based on my idea, i supposed to make a bright red buttercream to cover the cake. So, one day before his birthday, i made a white basic butter cream. My plan is to color it with red coloring agent until I get a red butter cream. And then, here comes the problem. A big problem. It was very difficult to make a red butter cream. I can not get red buttercream but I got pink one instead!! Pink mickey mouse cake for my son? Absolutely not. I have few type of red coloring agent I tried to use all of them, and none of them could give me a nice red color. I tried to add few drops of orange, green, and blue coloring agent to make the color become darker. Yes it was darker but still not becoming dark deep red like I want. It was really frustrating because I do not want to add too much coloring agent. It safe and foodgrade, but still a chemical agent with maximum usage. Beside, too much coloring agent will ruin the taste of the buttercream.

Thanks God, on those desperate time, I remember that I still have red modeling chocolate that I got few months ago as a birthday present from my friend. I've been wanting to try it  and compare the taste with fondant. I heard that modeling chocolate's taste is much better than fondant.


Well, rolling a huge amount of modeling chocolate was not as easy as rolling fondant. It was not as elastic as fondant. I had to knead it for a long time as well because it was so hard and firm before i roll it out. But yeah!! I did it! Now my cake is covered with red modeling chocolate. I got the color that I really want.

Now, it's time to assemble my cake. The final form is a little bit different than my design. Because of the excessive amount of cake, I put a small tier on the top of the lower cake. I covered it with green butter cream, cover the outer side with yellow fondant, and made small orange dots around the cake. I sprinkled some mini M&M's and colored sprinkles, put the mickey mouse figurine on the top of it and stick the stars on behind.


Because now I covered my cake with modeling chocolate, I thought that writing my son's name on the cake would be a little bit difficult if i were going to use fondant. So, I decided to put some mini cup cakes around the main cake, add some buttercream on the top, and stick the fondant on the top of it.


Voila!!! Done!! What do you think about my cake? is it cute?


After blowing the candle, I let my son play with the cake and he (together with his sister) "redecorate" the cake. Which one is better? His or mine? ^^

Tuesday, March 11, 2014

Still remember my last recipe? Javanese Fried Chicken or Ayam goreng Jawa. Like I told you before, I still have another recipe related with those delicious fried chicken. I'm going to make kremesan or crispy spiced flakes. It is a special condiment that is usually served together with Javanese Fried Chicken. It is very popular back in my hometown and makes the dish even more delicious. It is called kremesan because it is can be crushed very easily just only with bare hand (Kremes means to be crushed with bare hand).


I've learned how to make this condiments many many times using many different kind of recipe and I never succeed. Always failed. It always ended up as an oily fried batter. One time, I got this recipe from my friend's mother including all the tricks that I have to do to make kremesan. I tried it, and the result was awesome. I did it!! It was delicious, crispy and exactly like I wanted. It was not as hard as I thought but it was indeed a little bit tricky. That's why there will be a lot of tip on this recipe. I was using the leftover spiced liquid from making the fried chicken.  Do you want to try it as well?

Ingredients :
  • Leftover spiced liquid mixture from making Javanese Fried chicken
  • Some water
  • 1 egg yolk
  • 65 grams maizena
  • Salt, pepper, and garlic powder
  • Vegetable oil for deep frying
Warning! There will be a lot of oil splatter around the frying pan during the process. Cover the floor, wall, table around the pan with old newspaper if needed to make the cleaning process easier. 

Preparation :
  1. With a measuring glass, measure the volume of your spiced liquid. You should have about 400 ml of liquid.
  2. Add more water into the spiced liquid until you have 600 ml of liquid mixture. Adjust the taste with salt, pepper, and garlic powder if needed.
  3. Pour the mixture into a big bowl.
  4. Add egg yolk and maizena into the mixture. Mix well until all are combined.
  5. In a big deep frying pan, preheat vegetable oil to deep fry the batter. (Tip : the oil has to be very hot to fry the batter. If the oil is not hot enough, the liquid from the batter wont be able to evaporate fast in order to make a hollow texture and the batter will be sticky and sink down into the bottom of the frying pan. This hollow texture is the key to success making this crispy condiment)
  6. Meanwhile, prepare a big plate with few layer kitchen towel on the top of it. Set aside. 
  7. Once the oil is hot (try to drop few drop of batter. If there're a lot of bubbles appears from the batter and the batter does not sink, than the oil is hot enough), stir the batter few times and pour one ladle of batter into the pan. (Tip : Pour the batter from about 10-20 cm height from the surface of the oil to help the batter splash and spread faster and cooked at the same time. Do not pour the batter too slow otherwise it wont be cooked evenly at the same time. Tip : do not pour too much batter as well to make sure all the batter are rise up into the surface of the hot oil evenly. Tip : If your batter is not spread up right away on the surface of the oil but sink down to the bottom of the pan and become very sticky, that means, you were failed. Maybe because of the oil is not hot enough.  Do not give up. Remove it from the pan, wait for another minutes and pour another ladle.)
  8. Right after the batter is poured, you should be able to see a lot of bubbles on the surface of the oil coming out from the batter.
    Few seconds after that, the bubbles will start to disappear and the color of the batter start to become golden brown. 
  9. Once the color become golden brown, with wooden spatula, carefully spoon and fold (do not stir) the fried batter from the edge of the pan into the center of the pan.

  10. Fry it for another few seconds until most of the bubbles are disappear 
  11. With a strainer, remove it from the pan, drain well, and put it on the prepared plate.
  12. Let it cool and harden.
  13. Repeat the process with the rest of the batter.
  14. Serve it with Javanese fried chicken, hot steam rice, and sambal.
  15. Store the rest of the kremesan in an air tight container lined with kitchen towel.
Good luck ^^


Wednesday, March 5, 2014

My another favorite dish!! Javanese Fried Chicken or my family usually call it Ayam goreng Jawa. It is a very popular dish in Indonesia (especially in Java) and very common to be served together with hot steamed rice, sambal, and some raw vegetables (lalap) such as sliced cucumber, tomato, and lettuce. It is very delicious with its sweet and savory taste.


Actually, there are a lot of name for this fried chicken. Some people name it Ayam goreng ungkep (Fried slow cooked chicken) or Ayam goreng bumbu kuning (Fried chicken with yellowish spices). Well, actually those name are not wrong because of how we cook the chicken. The chicken will be cooked in mixed yellowish spices for about 30 minutes - 1 hour before deep frying until golden brown. I really like it. And the best part is I can cook the chicken days before and keep it in my refrigerator for days (even for weeks in freezer). When I want to eat it, I just need to take it out from my refrigerator, let it sit on room temperature for a while, and deep fry the chicken. 

Ingredients :
  • 1 kg chicken, cut into pieces
  • 4 medium shallots (about 10 Indonesian shallots)
  • 5 cloves of garlic
  • 4 candlenuts
  • 4 cm fresh galangal (about 1/2 tsp galangal powder)
  • 2 cm fresh ginger (about 1/4 tsp ginger powder)
  • 1/2 tsp turmeric powder
  • 2 tsp ground coriander
  • 2 tsp salt
  • 1 lemongrass, bruised and knotted
  • 1 bay leave
  • 1 tbs palm sugar
  • 400 ml canned coconut milk (medium thickness)
  • 400-500 ml water
  • a lot of vegetable oil
Preparation :
  1. Ground together shallots, garlic, candlenuts, galangal, ginger, turmeric powder, ground coriander and salt until you get a paste form. 

  2. In a big and deep pan (or a pot), preheat about 5 tbs vegetable oil.
  3. Add spices paste into the pan and saute the paste for about 30 seconds or until fragrant.
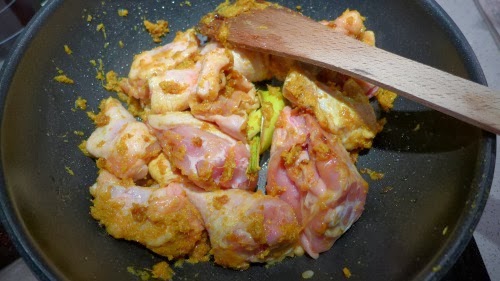
  4. Add the chicken into the pan together with lemongrass and bay leave. Stir them together for a while until most of the chicken are covered with the spices.
  5. Add coconut milk, water, bay leave,  and palm sugar into the pan and stir once again.
  6. Reduce the heat and simmer for about 1 hour until the chicken is well cooked. Stir it once in a while during the process.
  7. Turn off the heat, drain, and remove the chicken from the pan. (Tip: at this step, you can put the chicken in an airtight container and store it in refrigerator to serve it for another time. Tip : Do not throw away the leftover liquid from simmering the chicken. It can be used to make a delicious condiment later)
  8. In another big pan, preheat vegetable oil to deep fry the chicken.
  9. Once the oil is hot, deep fry the chicken until they become golden brown.
  10. Remove the chicken from the oil, drain well, and remove the excess oil using kitchen towel if needed.
  11. Serve the chicken hot with hot steamed rice, sambal, and some raw vegetables.
During the process of cooking the chicken, I got a lot of leftover spiced liquid mixture. From that spiced mixture I could make some crispy spiced flakes (or kremesan. Kremes means to be crushed easily just with bare hand). It is a very perfect and tasty condiments for this fried chicken.  I'm going to share the recipe next time.