Wednesday, March 5, 2014

My another favorite dish!! Javanese Fried Chicken or my family usually call it Ayam goreng Jawa. It is a very popular dish in Indonesia (especially in Java) and very common to be served together with hot steamed rice, sambal, and some raw vegetables (lalap) such as sliced cucumber, tomato, and lettuce. It is very delicious with its sweet and savory taste.


Actually, there are a lot of name for this fried chicken. Some people name it Ayam goreng ungkep (Fried slow cooked chicken) or Ayam goreng bumbu kuning (Fried chicken with yellowish spices). Well, actually those name are not wrong because of how we cook the chicken. The chicken will be cooked in mixed yellowish spices for about 30 minutes - 1 hour before deep frying until golden brown. I really like it. And the best part is I can cook the chicken days before and keep it in my refrigerator for days (even for weeks in freezer). When I want to eat it, I just need to take it out from my refrigerator, let it sit on room temperature for a while, and deep fry the chicken. 

Ingredients :
  • 1 kg chicken, cut into pieces
  • 4 medium shallots (about 10 Indonesian shallots)
  • 5 cloves of garlic
  • 4 candlenuts
  • 4 cm fresh galangal (about 1/2 tsp galangal powder)
  • 2 cm fresh ginger (about 1/4 tsp ginger powder)
  • 1/2 tsp turmeric powder
  • 2 tsp ground coriander
  • 2 tsp salt
  • 1 lemongrass, bruised and knotted
  • 1 bay leave
  • 1 tbs palm sugar
  • 400 ml canned coconut milk (medium thickness)
  • 400-500 ml water
  • a lot of vegetable oil
Preparation :
  1. Ground together shallots, garlic, candlenuts, galangal, ginger, turmeric powder, ground coriander and salt until you get a paste form. 

  2. In a big and deep pan (or a pot), preheat about 5 tbs vegetable oil.
  3. Add spices paste into the pan and saute the paste for about 30 seconds or until fragrant.
  4. Add the chicken into the pan together with lemongrass and bay leave. Stir them together for a while until most of the chicken are covered with the spices.
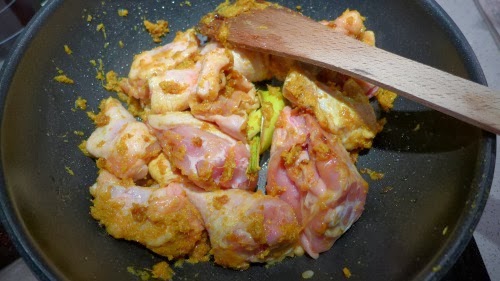
  5. Add coconut milk, water, bay leave,  and palm sugar into the pan and stir once again.
  6. Reduce the heat and simmer for about 1 hour until the chicken is well cooked. Stir it once in a while during the process.
  7. Turn off the heat, drain, and remove the chicken from the pan. (Tip: at this step, you can put the chicken in an airtight container and store it in refrigerator to serve it for another time. Tip : Do not throw away the leftover liquid from simmering the chicken. It can be used to make a delicious condiment later)
  8. In another big pan, preheat vegetable oil to deep fry the chicken.
  9. Once the oil is hot, deep fry the chicken until they become golden brown.
  10. Remove the chicken from the oil, drain well, and remove the excess oil using kitchen towel if needed.
  11. Serve the chicken hot with hot steamed rice, sambal, and some raw vegetables.
During the process of cooking the chicken, I got a lot of leftover spiced liquid mixture. From that spiced mixture I could make some crispy spiced flakes (or kremesan. Kremes means to be crushed easily just with bare hand). It is a very perfect and tasty condiments for this fried chicken.  I'm going to share the recipe next time. 

Wednesday, February 26, 2014

My daughter was celebrating her 8th birthday last month. She's getting bigger, smarter, and prettier. She asked me a tier cake for her birthday cake. On no!! I never made a tier cake before. Beside I don't have a small baking pan for it. I only have 9 and 8 inch baking pans and I don't really want to use it to make her tier cake because it was way too big. This year she only celebrated it with her 2 best friends at home. So, who will eat all those big cake.

About 1 weeks before her birthday, when I was doing some window shopping in a mall nearby, I found this kinderbakset. It is a box that is contained of many small cooking tools for children such as mini round and rectangle baking pan, mini roller pin, and some small cookie cutters. I was so happy to find it and bought it immediately. The size of the baking pan is so perfect for my tier cake.

Now, that I have the pan, I'm ready to make the cake. I already used chocolate cake for her birthday treats (no stick cake pop) so it seems that vanilla and orange cake with vanilla and orange butter cream frosting are perfect for her birthday cake.


What you think about my cake? :) Is it pretty? I colored my butter cream and decorate it with some fondant flowers Thanks to my friend, she gave me her leftover fondant to make this cute flower and even borrowed me her fondant cutter!!! I felt I was really lucky. 

I wrote her name on the cake by myself using store bought icing on tube.
First, I thought, it would make my life easier but I was wrong. The icing was hard to squeeze out and can not stick to the cake nicely. The other one was too watery and too pale and transparent. Kind of disappointed even tough I managed to write her name on the cake.


Do you know that this small  part is actually made from combination of my leftover chocolate cake that I made before for her birthday treats and some leftover scraped orange and vanilla cake that I got from leveling my cake. The story was that I forgot to think about her candle. When the cake was done, my husband asked me where would I place the candle if I put a tiara on the top of the cake. I did not have a small candles otherwise I could place it on the top of the first tier. And suddenly this crazy idea came into my head. I pile up some leftover cake that I have, make it stick into each other with butter cream, cut it square, cover it up with some more butter cream, and decorate it with some chocolate candy and flowers. Voila! Now, I could stick my candle. 


I found this cute little pink tiara in a grocery store and I put it on the top of the cake. To prevent the synthetic pink fur from the tiara stick into the butter cream, I roll a thin layer of fondant  and place it on the top of the cake. After it dry I can place the tiara on it without worrying the butter cream. My daughter loves this tiara. Right after she blew the candle, she and her friend took the tiara and play with it.


This is after I cut my cake. I was using cake pop stick for its support. So, of course I needed to be careful not to serve a slice of cake with cake pop stick inside. My daughter and her friend loved it. Especially the orange cake and orange butter cream. And so did I. :) Well, I have to admit this is not my best cake but i really did my best to make this cake. Next time better, for sure!! Promise

Wednesday, February 19, 2014

It has been three weeks after my last post. Oh my, after having such a busy week, finally I have a chance to update my blog. I want to share one of my favorite cake. Orange cake.


I've made this cake few times already including for my daughter's birthday cake. Actually, I got the recipe from here. Moroccan Orange Cake.  It's an easy recipe indeed. But in my opinion, it didn't have enough strong orange flavor. First, I wanted to increase the amount of orange juice. But if i do that, that's mean that I increase the volume of the liquid of my batter. My batter will be thinner than it's supposed to be and I worried that it will ruin my cake. That's why, I tried to concentrate the orange juice by boiling it before. For the first time, I was kind of afraid that the juice will taste bad and bitter after boiling process. But it was not. I added some sugar into the juice just to increase the sweetness of the orange juice itself.

This orange cake is really good with orange cream frosting or sugar glazing or even chocolate ganache.

Ingredients :
  • 2 eggs
  • 75 grams (3/4 cup) white granulated sugar
  • 63 ml (1/4 cup) vegetable oil
  • 128 grams (1 cup) AP flour
  • 2 tsp baking powder
  • 1/4 tsp salt
  • 100 ml orange juice + 3 tbs white sugar
  • orange zest from 1-2 orange
  • 1/2 tsp vanilla extract
  • few drop orange coloring agent (optional)

Preparation :
  1. In a small pot, boil mixture of orange juice and 3 tbs sugar.
  2. Once it's boiled, reduce the heat and simmer it until you get about 65 ml juice left. Stir once more, set it aside and let it cool completely.
  3. Preheat the oven to 180 C (356 F)
  4. Prepare a baking pan and line it with baking paper (I was using 21x8 cm loaf pan. But you can always use 20 cm round pan). Set it aside.
  5. In a big bowl, beat together eggs and sugar on high speed until it become thick and pale.
  6. Reduce the speed and add vegetable oil gradually.
  7. In another smaller bowl, whisk together flour, baking powder, and salt.
  8. Stir in the flour mixture into the egg mixture.
  9. Add orange juice, orange zest, and vanilla extract and stir the batter again until smooth. 
  10. Pour the batter into the prepared baking pan and level the surface.
  11. Put the baking pan into the oven and bake it for about 35-40 minutes.
  12. Remove from the oven and let it cool completely.

Thursday, February 6, 2014

Cumi gulai padang is one of my husband's favorite food. He's a huge fan of squid dish. Any kind of it. And this time i want to spoil him by making a squid dish with Padangnese curry sauce. We call this sauce Gulai. Gulai  is a type of food containing rich, spicy, succulent curry-like sauce. This dish is commonly found in Indonesia and Malaysia.  The main ingredients could be poultry, beef, offals (jeroan), and seafood. It is very delicious and goes well with hot steamed rice and sambal. I believe this kind of dish is one of a kind that can make every Indonesian feel homesick when they are abroad.


I got this recipe from my mother in law. She's good at making Padang or Aceh dish. I tried her recipe and it turned out great. Everybody like it. Even my daughter like it. Actually, I was not so sure she would eat it, but she liked it as well. The squid was chewy but tender. I didn't throw away the tentacles. They are edible too as long as you do not overfry them. The sauce was rich with a bit touch of lemongrass and tamarind. The spiciness was acceptable (not spicy enough i think. But otherwise my daughter won't be able to eat it). My idea adding some fried tofu was excelent as well. Basically it was because of some economical reason but acceptable.

That's why, I'd love to share this recipe. To share my happiness when I ate this dish. :-)

Ingredients :
  • 800 grams squid
  • 200 grams tofu, cut into 3 cm cubes
  • 3 shallots
  • 3 cloves of garlic
  • 3 candlenuts
  • 1 chili pepper, remove the seeds
  • 1/4 tsp turmeric powder (or about 3 cm fresh turmeric root, peeled)
  • 3 cm fresh ginger, peeled
  • 1 lemon grass, bruised and knotted 
  • 1 bay leaves
  • 1/2 tsp tamarind paste (reduce the amount if you have a very sour paste)
  • 500 ml coconut milk
  • salt and pepper
  • about 1 1/2 cup vegetable oil
Tip : feel free to add some small chili peppers (cabai rawit) if you want to make a spicy version 

Preparation :
  1. Clean the squid by removing the internal organ, cartilage (white transparent squid back bone), eyes, and the ink sac. (Tip : You can see the pictures in here ) No need to remove the outer skin/membrane but feel free to do it. 
  2. Wash it under the running water and dry it nicely with kitchen towel.
  3. Blend together shallots, garlic, candlenuts, chili pepper, turmeric, and ginger until you get a paste form.
  4. In a pan, pour and preheat the vegetable oil to fry the tofu and the squid.
  5. Fry the tofu for about 2 minutes until the surface become golden brown
  6. Remove the tofu from the oil and drain it well.
  7. Put the clean squid into the same pan and fry it for about 30 seconds. ( You can see the tentacles start to shrink and curled up)
  8. Remove the squid from the oil and drain it well.
  9. In another pan, preheat about 4 tbs vegetable oil.
  10. Add the spice paste and saute for about 3 minutes until fragrant.
  11. Add fried tofu and squid into the pan and stir it carefully until they are covered with the spices.
  12. Add lemon grass, tamarind paste, bay leave, and coconut milk.
  13. Stir again and bring it to a boil.
  14. Reduce the heat and simmer it for about 20-30 minutes until the liquid is slightly reduced and the coconut milk become slightly oily.
  15. Turn off the heat and serve it hot with hot steamed rice and green sambal.
Tip : do not fry the squid too long otherwise you will get a very tough squid. But you can not skip this process as well otherwise during the cooking process you will get a excess water coming out from the squid. 

Friday, January 31, 2014

Everybody is sick!!! It seems like there is a flu epidemic in my house. Red noses and red eyes everywhere including mine. But, who could blame them for being sick. The weather is not friendly either. Cold, windy, and wet. It is annoying and not nice.

Well, it was few weeks ago. Now everybody is getting better again even the weather is still cold and not really friendly. During that horrible time, I made roasted chicken soup for my family. Chicken soup is a perfect dish for that time. Many people, including my grandmother said that chicken soup is healthy dish and can be used to treat flu symptoms. Even from what I've read in The New York Times, there was a scientific research that chicken soup contains amino acic cysteine which can help to clear the respiratory system. Chicken soup can also inhibit the movement of neutrophils, the most common white blood cells that defends against infection. Hmm.. whatever it is, chicken soup is good for treating flu people. It is served hot, contains fat, proteins from the chicken itself, and vitamins and minerals from the vegetables. Besides, it tastes good with all those spices inside.


My chicken soup is made from roasted chicken. I was using roasted chicken because it makes the taste even better and make the chicken meat more tender than using boiled non-roasted chicken. Look at my sup merah recipe as well. I always use roasted chicken for my soup. It really makes a big difference at the taste of my soup

First, lets make the roasted chicken (or you can see how to make roasted chicken from my sup merah recipe)
Ingredients :
  • 2 Chicken thighs
  • 2 cloves of garlic
  • 1 cup mixed diced carrots, celery, and onion
  • 1 stick of rosemary
  • 4-5 tbs olive oil
  • salt and pepper
Preparations :
  1. Preheat the oven for 210 C (410 F)
  2. Prepare an ovenproof dish.
  3. Scatter half cup of diced vegetables on the dish.
  4. Put the chicken on the top of it.
  5. Scatter the rest of the vegetables, garlic, and rosemary around the chicken.
  6. Pour some olive oil on the top of the chicken.
  7. Sprinkle generous amount of salt and ground black pepper.
  8. Put the chicken into preheated oven and roast it for about 45 minutes.
After done making the roasted chicken, lest make the soup. 
Ingredients :
  • 1 medium onion, minced
  • 3 cloves of garlic, minced
  • 1 1/2 medium shallot, minced (about 4 Indonesian shallots)
  • 120 grams carrots, diced or sliced
  • 120 grams green beans, sliced about 2 cm each
  • 50 grams frozen peas
  • 150 grams celery, diced
  • 2 roasted chicken thighs
  • 1 bayleave
  • 1/2 tsp ground nutmeg
  • 1/4 tsp ginger powder
  • 1/4 cup (about 28 grams) elbow macaroni
  • 1 leek (white part only), thinly sliced
  • 2 liter water
  • 5 sticks canned sausages (hot dogs), sliced
  • 3 tbs vegetable oil
  • salt and pepper
Preparation :
  1. In a big pot preheat the vegetable oil.
  2. Add minced shallot, onion, and garlic into the pot and saute until the onion and shallot become translucent.
  3. Add celery and carrots into the pot and saute again until those vegetables become a bit tender.
  4. Add roasted chicken into the pot
  5. Pour water into the pot until the chicken is submerged.
  6. Add ground nutmeg, ginger powder, bay leave into the pot and stir it lightly.
  7. Reduce the heat and simmer it for about 30-40 minutes.
  8. Remove the foam that appear on the surface.
  9. Remove the chicken from the pot, separate the bones from the meat, and . 
  10. Add sliced sausages, frozen peas, elbow macaroni, and sliced leek into the pot.
  11. Add back the boneless chicken into the pot.
  12. Stir and simmer again for about 10 minutes until the macaroni become tender.
  13. Adjust the taste with salt and pepper.
  14. Turn off the heat and serve it hot with toasted bread, or hot steamed rice, or with crouton.
Tip : You can always use any other kind of vegetables such as cauliflower, broccoli, sugar snaps, or baby corn. 

Tip : Fried shallot is a good condiment for chicken soup as well. Sprinkle it on the top of the soup or steamed rice right before serving it. 

It is always possible to freeze the leftover of chicken soup. Put it in an airtight container or thick plastic bag, and put it in a freezer. When you want to eat it again, just let it sit in a room temperature for about 1-2 hour and put the frozen soup into a pot. Turn on the heat and simmer it on low heat until all the liquid is melted.